Frequently Asked Questions

(Click on question to see the answer.)

HOW TO PLACE AN ORDER
HOW TO PLACE A RE ORDER
HOW TO APPROVE A PROOF
APPROVE FROM MOBILE
HOW TO PERSONALIZE A TEMPLATE

Artwork files must be uploaded along with your order before we can view them. We will print directly from the file uploaded and email you when the proof is ready to be approved. We will not print until the proof has been approved. A full refund will be given if your file is not acceptable.

1. Hover over My Account at the top right of our website then click on Orders.
2. Login with your username and password.
3. Orders are listed by date of order, starting with your most current order. Select the correct order by clicking the “View” button, then the next page will have a reorder button that will place that into your account with you file

If you need to change any options on your order you can click on modify to change your starting number or etc,

If you want to change your artwork you will need to start from a new order rather then reordering.

If you reject your proof for printing, please email a new file to info@lighthouseprinting.com. You will receive another proof to approve. We are unable to put any order requesting a proof into production without the proof approval.

Please enter the coupon code (i.e. 2018-5) on the “Cart Summary” page in the box that says “Coupon Code”. Be sure to click “Apply Coupon”.

You can see screen shots of where to enter the coupon code on the “Coupons” page. Once you have continued past the Shopping Cart it is not possible to return to enter the Code. Please email us if this happens.

Login and Account Questions


You can find all your account information by clicking on “My Account” in the upper right of the website.

We save all your files and orders to make it easy for you to reorder or to find your files you have uploaded. In order to do this, each of our customers must have a login with a username and password so only you can see your files and orders.

1. Click the “Lost your password?” link in the log in box
2. Enter your email and click the Reset password button”
3. An email with a link for changing your password will be sent to the email address on the account. Be sure to check your SPAM folder if you do not see it in your IN box.
4. Click the link and you will be taken to the Change Password page. Enter a new password and confirm your password.
5. You are now logged. You may place your order or reorder.

Finishing Options Questions


Carbonless forms are “edge glued” at the top, side or bottom of the form, meaning that when you pick-up a “set” (white/canary, etc.) they will be attached at the edge with a compound that makes them stick together but is very easy to tear off the top or bottom copy without damaging the other copies.

Side to Edge-Glue:

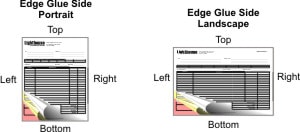
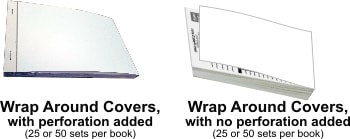
You may also have them bound into books (25 or 50 sets bound together with a cardstock back that wraps around from the back to the front and can tuck under the first set). That option is additional and is found in the “Finishing Options” area entitled “Wrap Around Covers”. Scroll down the page to see the picture of a Wrap Around Cover.

When you have printing on the back side of each of the parts of carbonless paper (Back of the white and back of the yellow). Most people use the back sides for Terms and Conditions or other information for their customers.

The back sides of carbonless sets do not transfer from one sheet to another. (i.e. 2-part carbonless transfers from the white sheet to the yellow sheet, you can not turn it over to transfer from the yellow sheet to the white sheet.) The chemical on the paper does not work both directions.

If you need your print project to fit into a binder or other 3 ring holder, choose this option to drill 3 equally spaced holes alongside the region of the letter format. The distance of the hole’s center to the paper edge is a standard 12 mm. 

Your order will be packaged in 50 or 100 sets per package encased in a clear shrink-wrap film. If you order 10,000 sets you will receive 10,000 sets, but the number of sets per package may vary by up to ±10%. If you need an exact number of sets per shrink-wrapped package, we recommend adding numbering to ensure an exact quantity per package.

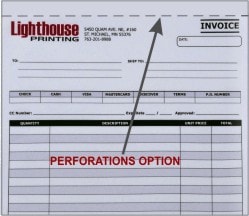
Perforations ( dotted impressions on the paper so you can tear it off) can go anywhere on the sheet, but must go across entire sheet either horizontally or vertically.

Carbonless forms are edge glued at the top or sides and will tear apart very easily without ripping any of the paper without a perforation. But, if you have your forms put into books with wrap around covers and you want one of the parts to stay in the book, we recommend adding 1 perforation horizontally at the top.

Perforation will be placed 1/2″ from the edge of the sheet and on the glued edge side, unless specified in the “Comments” section.

25 or 50 sets of your form will be bound together in a book with a white cardstock back that wraps around from the back of the forms and tucks under the first set. When you write on the first set it will not transfer through to the next set. Orders put into books without sequential numbering may vary ±10% in the number of sets per book. If you need an exact number of sets in each book, we recommend adding numbering to ensure an exact quantity per package.

We also recommend adding perforations for 3-part and 4-part forms, or even 2-part forms if you want the canary copy to stay in the book.

We can place your numbers for numbering any place on your form. You may select “Upper Right”, “Upper Left”, “Lower Right”, “Lower Left” or “As in Artwork”. You must be specific as to where the number is to be placed if you select “As in Artwork”.

Numbering is done in RED. Numbering must be 4-8 digits and no letters.

Please allow 1-1/2″ wide x 1/2″ tall area for numbering.

Artwork and File Questions


We prefer PDF files. We also accept Word, Excel, Publisher, Illustrator, eps, or jpg files. If you send anything other than a PDF, we recommend that you ask to see a proof.

Yes, we require 1/4 inch margins on all carbonless printing, and that artwork is uploaded in the same size that you are ordering. You can see all our artwork requirements by clicking on “Artwork” in the upper red bar.

In printing, bleed is printing that goes beyond the edge of where the sheet will be trimmed. In other words, the bleed is the area to be trimmed off. The bleed is the part on the side of a document that gives the printer a small amount of space to account for movement of the paper, and design inconsistencies. We prefer a bleed of 1/8″ inch on each side that will print off the edge of the paper.

Once you have selected the correct form size and entered all needed options, click “Add To Cart”. You will be directed to login (if you haven’t already done so) and then be directed to the Upload File page. Drag and drop or Browse for your file. Click “Upload”. Once your file is uploaded a “Continue” button will display.

You can scan the document if you have a high quality scanner (we recommend a 300 dpi scan), however, the printed quality will not be any higher than the original scan.

Yes, you will find many templates available (check the “Categories” – Receipts, Invoices and Other Template categories, in the left-hand bar). You will be able to select a template that works for you and once you enter quantity and other information, you will be taken to the Design page to enter your personal information for the top 5 lines.

Ordering and Reordering Questions


Since it is not possible for us to make changes to an existing order, you will need to enter the order again. Please be sure to select the “Ink” option as “Full Color”.

The original file has already been converted to black, so please upload a new PDF file in full color.

In the “Comments” box on the “Upload” page, please let us know to cancel your first order. Or, simply email our production team at the same email address as your order confirmation.

We’re sorry, we do not take phone or email orders. To keep all your orders and files saved for future use, and to expedite production, we require that you order online at www.lighthouseprinting.com. We can certainly help with any questions by emailing our production department: info@lighthouseprinting.com

Quantity is in individual “sets” NOT “books”. A “set” is: 2-part (white/canary) edge glued on one side; 3-part (white/canary/pink) edge glued on one side.

FOR BOOKS (use the “Wrap Around Cover” option, located in the “Finishing Options” area towards the bottom).

 1 book x 50 “sets” per book = Quantity 50
5 books x 50 “sets” per book = Quantity 250
10 books x 50 “sets” per book = Quantity 500
20 books x 50 “sets” per book = Quantity 1,000
25 books x 50 “sets” per book = Quantity 1.250
1 book x 25 “sets” per book = Quantity 25
4 books x 25 “sets” per book = Quantity 100
10 books x 25 “sets” per book = Quantity 250
20 books x 25 “sets” per book = Quantity 500
40 books x 25 “sets” per book = Quantity 1,000

We accept all major credit cards, including American Express and Paypal. Sorry, we do not accept Purchase Orders. To ensure your order gets processed right away, payment is required at the end of checkout.

If your order is “In Production”, no changes can be made to the order. If the proof has not been approved, the order will need to be cancelled and a new order will need to be placed with the correct information. If there has been a proof sent, there may be a cancellation fee.

Your job should be ready to ship in 3 business days. Production days start once proof has been approved. Cut off time for proof approval is 10 a.m. C.T. If you have a large order with bindery (i.e., numbering, or wrap around covers, 1-2 extra days may be needed.) Faster turn-around times are available but do have an extra charge. They are:

Same day turnaround – Order and proof approval by 10 a.m. C.T. ships same day (Black ink only, no sequential numbering, perforating or wrap-around covers)

Next day turnaround – Order and proof approved by 10 a.m. C.T. ships next day (i.e. approved Monday, ships Tuesday – numbering, perforating or wrap around covers may add 1 day)

Second day turnaround – Order and proof approved by 10 a.m. C.T. ships in 2 days (i.e. approved Monday, ships Wednesday)

Shipping time is extra. UPS Ground Times Chart can be found under SHIPPING AND RETURNS in the left column.

Yes, choose the Blind Ship option in the Finishing Options section. We will ship to your customer using a UPS label with no return address in an unmarked carton.

Please add each form (1-page only, unless printed on the backs) to your cart one at a time. Please be sure you have a separate file for each form. Enter the order for the first form, click “Add to Cart”, upload file for form 1 — Continue. Now click “Add More To This Order” button and enter the 2nd form. Do the same for each form.

If your form has a page 1 and a page 2 that need to be collated together, see our 2-page form here. 2 forms collated together


CLICK HERE FOR ARTWORK INSTRUCTIONS

CLICK HERE FOR FULL COLOR ARTWORK INSTRUCTIONS