
Artwork Guidelines
Do not upload scanned or photographed documents. Only original digital files are accepted.
Carbonless forms and Envelopes
- Preferred Format
- PDF (with all fonts embedded)
Also Accepted
- Microsoft Word
- Excel
- Publisher
- Open Office files
Note: When using Word, Excel, or Publisher, we recommend converting your file to PDF before upload to avoid font and layout changes.
We do not create or adjust your files or artwork. Pictures of your form are not acceptable artwork.
2. Color Mode
Use CMYK color mode for print.
Files submitted in RGB and Pantone colors may shift in color when printed.
3. Resolution
- All artwork should be at 300 DPI (dots per inch) at final print size.
Avoid:
- Low-resolution web images
- Screenshots
- Images copied from websites (usually 72 DPI)
Brochures / Flyers / Booklets / Postcard / Business cards
1. Color Mode
Use CMYK color mode for print.
Files submitted in RGB and Pantone colors may shift in color when printed.
2. Resolution
- All artwork should be at 300 DPI (dots per inch) at final print size.
Avoid:
- Low-resolution web images
- Screenshots
- Images copied from websites (usually 72 DPI)
4. Bleed & Safe Area
To avoid white edges or cut-off elements:
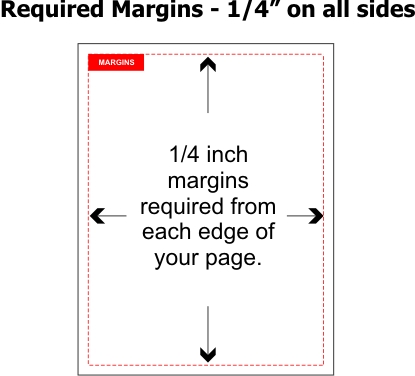
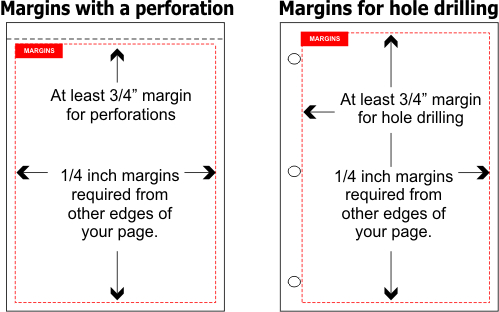
Print Area & Layout Requirements
Bleed (Outer Edge):
Add 0.125″ (3 mm) of bleed on all sides beyond the final trim size.
Safe Zone (Inner Margin):
Keep all important elements (text, logos, graphics) at least 0.125″ (3 mm) inside the trim edge to prevent accidental trimming.
Example Document Setup (US Letter – 8.5″ × 11″)
| Specification | Size (inches) | Notes |
|---|---|---|
| Final Trim Size | 8.5″ × 11″ | This is the finished product size. |
| Document Size with Bleed | 8.75″ × 11.25″ | Includes 0.125″ bleed on all sides. |
| Safe Zone | 8.25″ × 10.75″ | Keep all essential content inside this area. |
File Preparation Notes
- Files should be created 0.25″ larger than the final trim size (0.125″ bleed on each side).
- If you cannot add bleed:
Make sure your artwork or background color still extends fully to the trim size edges. We can add a mirrored bleed for you if needed. - Always keep text, logos, and any important information inside the safe zone to ensure they are not trimmed off.
5. Fonts & Text
- Convert all text to outlines (vector files)
OR - Include embedded fonts in your PDF.
This prevents font substitution or layout shifting.
6. Avoid These Common Issues
❌ Text too close to edges
❌ Low-resolution images (pixelation)
❌ RGB color files causing color shifts
❌ Missing bleed
❌ Thin borders (may appear uneven after trimming)
7. Double-Check Before Uploading
- Spelling and grammar
- Contact details, dates, addresses
- Final size and orientation
We print your file as provided, so please ensure everything is correct before submission.
Scanned Images
Scanned images (Not recommended) should be scanned at ACTUAL print size and at least 300 DPI resolution.
Guidelines For Creating a PDF File
 MICROSOFT WORD: (Older than Word 2013)
Open File and use the “Save As” option and then the “PDF” option. In the Options Button be sure the “bitmap text when fonts can not be embedded” checkbox is checked.
MICROSOFT WORD: (Word 2013 or 2016)
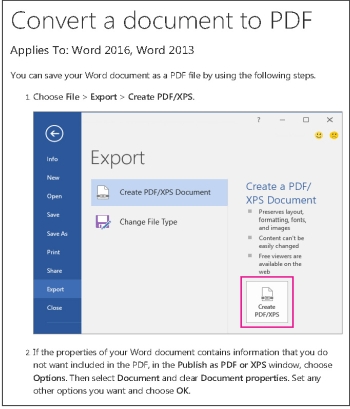
TO MAKE A SPECIFIC PAGE SIZE: Open a new file and in the Page Layout Tab select the Size category (Statement would be the 5.5 x 8.5 size) You can adjust the margins using the Margins tab and if you want it Landscape instead of Portrait adjust the Orientation Tab.
 MICROSOFT EXCEL:
Open File and use the “Save As” option and then the “PDF” option.
TO MAKE A SPECIFIC PAGE SIZE:Open a new file and in the Page Layout Tab select the Size category (Statement would be the 5.5 x 8.5 size) You can adjust the margins using the Margins tab and if you want it Landscape instead of Portrait adjust the Orientation Tab.
 MICROSOFT PUBLISHER:
Open File and use the “Publish as PDF or XPS” option and then the Optimize option of “Commercial Press”.
TO MAKE A SPECIFIC PAGE SIZE: Open a new file and select Blank Page Size and then Create Custom Page Size. Enter the dimensions (half page would be 5.5 x 8.5). Then select Create (lower right hand button.)
 ADOBE INDESIGN:
Open File and use the “Export” and be sure to use the PDF (Print) option and then the [High Quality Print] option.
 CORELDRAW:
Open File and use the “Publish As PDF” option and then the “PDF preset” option select Prepress.
 JPG FILES
JPG files (Joint Photographic Group) are normally used for images only so any type and graphics will not be clear. Any JPG files uploaded should be scanned or saved as 300 dpi and will be required to have a proof approval before being placed into production.
 ILLUSTRATOR:
Open File and use the “Save As or File > Save A Copy” option and then Choose Adobe PDF (*.PDF) as the file format, and click Save.
 PHOTOSHOP:
PDF FILES CREATED FROM PHOTOSHOP ARE NOT RECOMMENDED FOR PRINTING CARBONLESS FORMS.
Photoshop’s PSD format saves projects by storing individual layers as raster files.
Raster files store type and images as pixels, so their quality drops.
Vector graphics store images using mathematical algorithms and they remain clear no matter how much you enlarge them.
Unfortunately, Photoshop can NOT save files as Vector graphics, so any type or graphics created in Photoshop will become raster graphics.
STEPS TO CREATE A PDF FROM PHOTOSHOP
Step 1
Press “Ctrl-Shift-S” to open the Save As dialog box.
Step 4
Click the “Format” drop-down box. Select “Photoshop PDF (*.PDF, *.PDP).”
Step 5
Click “Save” to save the PSD file as a PDF.